Tuesday, March 1, 2011

Create a Skype Logo

Select the next instrument to represent three circles (keeping pressed the Shift button represent firstly the upper circle, then the middle one and finally the lowest one) with the sizes indicated next picture.

Create Skype Logo in Photoshop CS


Blending Options-Gradient Overlay


Create Skype Logo in Photoshop CS

Gradient’s parameters.


Create Skype Logo in Photoshop CS

Create Skype Logo in Photoshop CS

Copy the new made layer 2 times and minimize one copy with Free Transform selection. Fill 0% on the layers and apply the demonstrated parameters below.

Create Skype Logo in Photoshop CS

Blending Options-Stroke

Create Skype Logo in Photoshop CS

Gradient’s parameters.

Create Skype Logo in Photoshop CS

The second copy must be minimized too. Fill 0% on the layers and apply the next instrument (holding the Alt button) to represent an ellipse which will delete the unnecessary part. Use the sizes from next step.

Create Skype Logo in Photoshop CS

Blending Options-Gradient Overlay

Create Skype Logo in Photoshop CS

Gradient’s parameters.

Create Skype Logo in Photoshop CS

Add next the text, keeping the type, size and the color indicated in the next table.

Create Skype Logo in Photoshop CS

Create Skype Logo in Photoshop CS

Merge down now all the layers, representing the blue icon with S letter in a group (CTRL+SHIFT+E). Copy the new made group and apply Free Transform action to turn it around. Click on this

Create Skype Logo in Photoshop CS

on the layers and make use of the next instrument, exactly like it is demonstrated next step.

Create Skype Logo in Photoshop CS

The final result is this one!
Read More.

Bookmark and Share

Photoshop Graffiti Tutorial

Open the photo with the textured surface.


Go to Image -> Duplicate


A new window will come up asking you to give the duplicate image a name (wall copy)


Now save the duplicate image as wall copy.psd. Close the duplicate image.


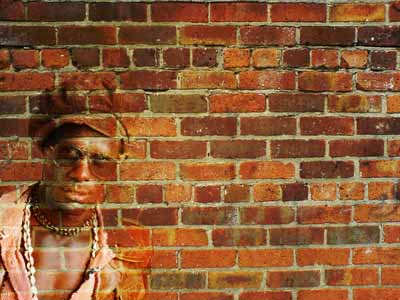
Back at our original Image and paste in new layer photo of your favorite singer.


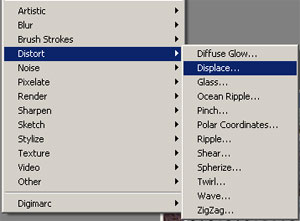
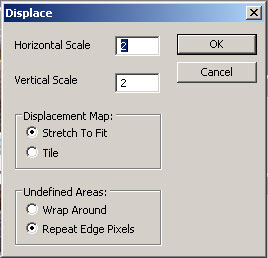
Go to Filter->Distort->Displace


You can experiment with the settings to find the ones that better suit you needs.


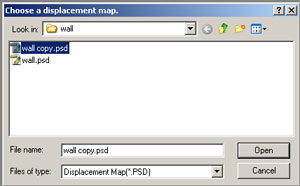
A window will come up asking you to select a displacement map. Find and select the duplicate image that you created at the start of the tutorial (“wall copy.psd”) and press open.


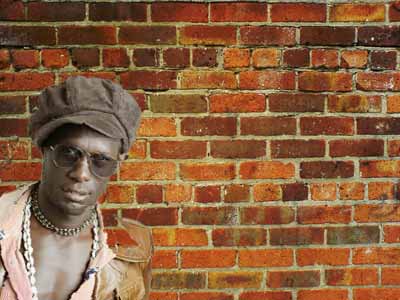
Here is the result of the displacement filter.


Change the layer blending mode. I used “Hard Light”. When using different colors of the background layer is different than the one I used for this tutorial, other blending modes may work as well:


Ok now you are going to have to experiment here.

With a lighter image you are gonna wanna go to Filter>Brush Strokes>Ink Outlines:


With a darker image you are gonna wanna go to Filter>Distort>Diffuse Glow:


My final results:


Now add text graffiting I suggest downloading this font.


Add your text with color #FFE600.


Rasterize and appply the same effect with Filter->Distort->Displace.


Set the layer blending mode to “Overlay”.


Go to Blending Options>Stroke


Size: 2px

Position: Outside

Blend Mode: Normal


Opacity: 100%

Fill Type: Color

#8B2828


My results:


Read More.

Bookmark and Share
Related Posts Plugin for WordPress, Blogger...
saifuddin
aceh
BANDA ACEH
NANGGROE ACEH DARUSALAM
aceh, male, 23000
nanggroe aceh darusalam
Work: 06517555275
Fax: 06517555275
uddin_bireun@yahoo.com
Visit MyBlogLog and get a signature like this!
Add to Google Reader or Homepage Internet Marketing & SEO (Affiliates) - TOP.ORG Google bot last visit powered by [0051] Software Top Blogs powered by [0051] Yahoo bot last visit powered by  [0051]

SOFTWARE DOWNLOAD AND TUTORIAL PHOTOSHOP CORELDRAW ©Template Blogger Green by Dicas Blogger. SOFTWARE DOWNLOAD AND TUTORIAL PHOTOSHOP CORELDRAW ©Template Editing by Udin Sira.

TOP